NetBackup 7.7.2 VMware backup Configuration Tutorial:
1. Add VMware Vcenter/vcloud Director/VMware ESX server information.

2. Select your Virtual Machine Server Type.

3. Provide the server's user credentials.

4. User name and password once authenticated, then it will add to netbackup master server's virtual machine server.

5. In this example i have added the vcenter server.

6. Same as i have added the VMware ESX server also.

7. Now you can able to see both the virtual machine servers.

8. In Master server host properties add the vmware access hsosts (vmware backup host).

9. You can configure the resource limits also.

10. Now create a vmware type policy using Admin console wizard or CLI.

11. Select your policy type vmware or Hyper-V.

12. Specify the vmware policy name and select the hypervisor type (vmware or hyper-V).

13. Select the policy storage unit.

14. Vmware policy features to configure.

15. Select the advanced features.

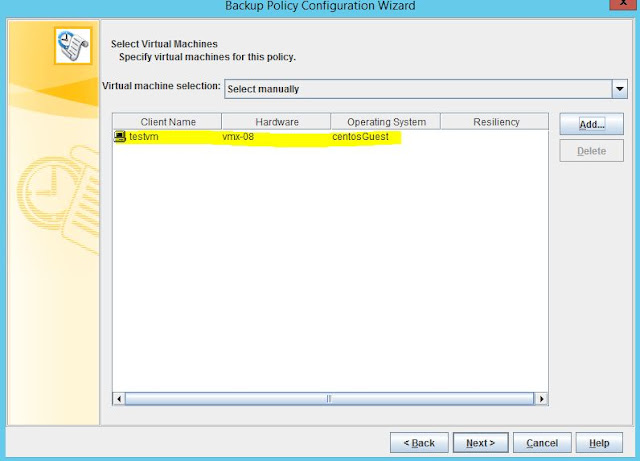
16. Then select the virtual machines to backup (automatic or Manually)

17. Select the vm's to backup.

18. Now the vm is added to backup client list.

19. Select the backup types.

20. Select the schedule, frequency and retention levels.

21. Select the backup window.

22. Summary report of policy.

23. Now vmware policy got created.

24. To test run a manual backup.

25. Accessing through vsphere client, the testvm is running.

26. Backup got initiated.

27. It is initiating the snapshot and then backup of vm.

28. Virtual machine backup done successfully.

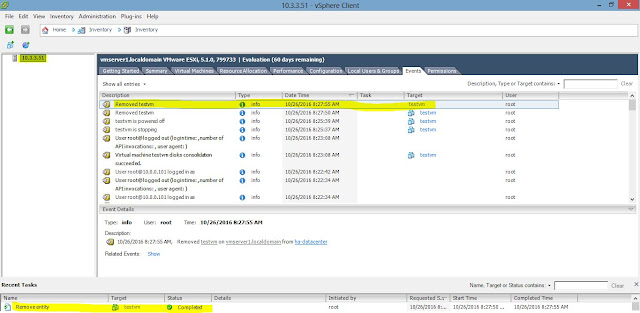
29. For testing purpose, delete testvm from the ESXserver.

30. Testvm server got deleted.

31. Now we go restore and recover the virtual machine from BAR GUI.
Select your vm backup image.

32. Select your restore options.


33. Test the restore activity and start the restore.

34. Restore activity initiated successfully.

35. Now it is restoring the vmdk files to ESX server data store.

36. Then restoration successfully completed.

37. Now check in the vsphere client, you can able to see the testvm server.

1. Add VMware Vcenter/vcloud Director/VMware ESX server information.

2. Select your Virtual Machine Server Type.

3. Provide the server's user credentials.
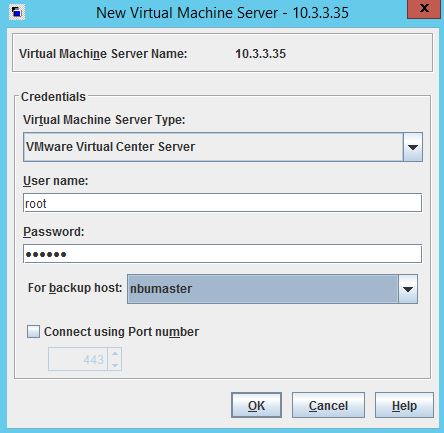
4. User name and password once authenticated, then it will add to netbackup master server's virtual machine server.

5. In this example i have added the vcenter server.

6. Same as i have added the VMware ESX server also.

7. Now you can able to see both the virtual machine servers.

8. In Master server host properties add the vmware access hsosts (vmware backup host).

9. You can configure the resource limits also.

10. Now create a vmware type policy using Admin console wizard or CLI.

11. Select your policy type vmware or Hyper-V.

12. Specify the vmware policy name and select the hypervisor type (vmware or hyper-V).

13. Select the policy storage unit.

14. Vmware policy features to configure.

15. Select the advanced features.

16. Then select the virtual machines to backup (automatic or Manually)

17. Select the vm's to backup.

18. Now the vm is added to backup client list.


19. Select the backup types.

20. Select the schedule, frequency and retention levels.

21. Select the backup window.

22. Summary report of policy.

23. Now vmware policy got created.

24. To test run a manual backup.

25. Accessing through vsphere client, the testvm is running.

26. Backup got initiated.

27. It is initiating the snapshot and then backup of vm.

28. Virtual machine backup done successfully.

29. For testing purpose, delete testvm from the ESXserver.

30. Testvm server got deleted.


31. Now we go restore and recover the virtual machine from BAR GUI.
Select your vm backup image.

32. Select your restore options.


33. Test the restore activity and start the restore.

34. Restore activity initiated successfully.

35. Now it is restoring the vmdk files to ESX server data store.

36. Then restoration successfully completed.

37. Now check in the vsphere client, you can able to see the testvm server.

No comments:
Post a Comment