Saturday, February 29, 2020

NetBackup 8.1.2 NDMP Backup Configuration (NetApp ONTAP 9.7)


NetBackup for NDMP

NetBackup for NDMP is an optional NetBackup application. It enables NetBackup to use the Network Data Management Protocol (NDMP) to initiate and control backups and restores of Network Attached Storage (NAS) systems.

NDMP policies in NetBackup

After you install and configure NetBackup for NDMP, you can schedule backups by creating an NDMP policy in NetBackup.
An NDMP policy can have one or more NetBackup clients. Each NetBackup client must be an NDMP host.

The allowable backup types for schedules in an NDMP policy are: Full, Cumulative Incremental, or Differential Incremental. User-initiated backups and archives are not allowed because the NDMP protocol does not permit these tasks.

Restores of NDMP host backups can be initiated from any NetBackup media server that meets the following criteria:
·        Resides within the same overall NetBackup storage domain
·        Uses the same NetBackup master server that the media server uses to perform the backup

NetBackup recommends that a NetApp cDOT cluster run in SVM-scoped NDMP mode (also called Vserver aware mode).

NetBackup supports optimal backup, restore, and duplication of NetApp cDOT FlexVol volumes using the CAB extension. The NetApp cDOT server (that runs in Vserver aware mode) provides unique location information (affinity) about volumes and tape drives. 

Using this affinity information, NetBackup performs a local backup instead of a three-way or remote backup if a volume and a tape drive share the same affinity. If multiple volumes that are hosted on different nodes are backed up or restored using the same job, NetBackup may switch drive paths if necessary (and possible) to perform the local backup.

I. ONTAP 9.7 NAS Filer NDMP Configuration:


Check the SVM has enabled with ndmp service. Default NDMP service is not enabled.


Check the SVM supports NDMP Protocol. If it is not, add the protocol to the svm.


Create backup user for that SVM.


Check the SVM Management LIF and IP Address.


Enable the NDMP service.


List the volumes in SVM. 


II. NetBackup NDMP Configuration:
Add the NDMP Host (ONTAP 9.7 Storage).


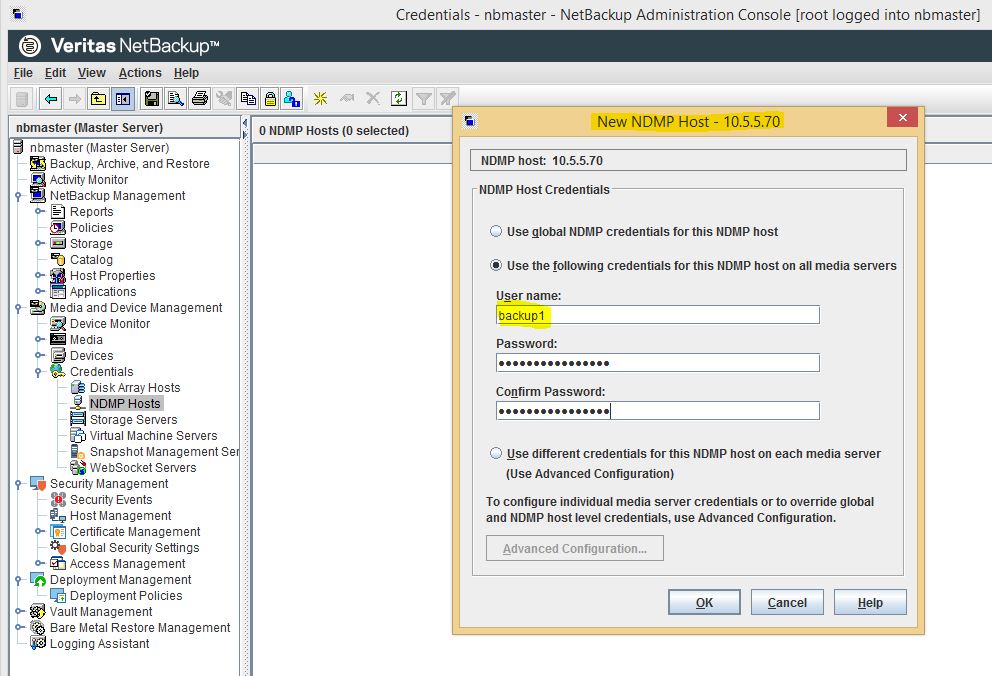
Provide the svm user credentials.


NDMP Host Added successfully.


Creating a New Policy for NDMP Backup.


Select the policy type is NDMP ans select the policy storage.


Create a schedule with backup type and Backup window time.

The allowable backup types for schedules in an NDMP policy are: Full, Cumulative Incremental, or Differential Incremental. User-initiated backups and archives are not allowed because the NDMP protocol does not permit these tasks.


Add the NDMP Host.


NetApp ONTAP 9.7 (cDOT) added.


Select the volumes, qtrees or files to backup.


Run a Manual Backup to test.


Backup is running.


Backup Job done successfully.


To restore the volumes select the policy type and client then select the files to restore.


Restore initiated and done successfully.


Even you restore to another location also.


Friday, February 28, 2020

ORACLE RMAN Backup using NetBackup 8.1.2


NetBackup for Oracle

NetBackup integrates the database backup and recovery capabilities of the Oracle Recovery Manager (RMAN) with the backup and recovery management capabilities of NetBackup.

Oracle RMAN

RMAN performs a wide variety of automated backup and recovery functions. During a backup or a restore, RMAN provides the interface to the databases, and it extracts and inserts data.

To start a database backup or restore, the database administrator runs the rman command. You can run this command from the command line, a script, or an application such as NetBackup. The RMAN script is used as a parameter to the rman command and specifies the operations to be performed (for example, backup or restore). The RMAN script also defines other components of the operation such as the database objects to be backed up or restored.

During a backup or restore, RMAN controls the data streams going into or out of a database. RMAN can access storage devices when it is integrated with a media management system, such as the system that NetBackup provides.

RMAN provides true incremental backups. An incremental backup backs up data files and includes only the blocks that have been changed since the last incremental backup.

Oracle recovery catalog

The recovery catalog is a repository of information. RMAN uses the information in the recovery catalog to determine how to perform requested backup and restore actions.

The recovery catalog contains information about the following software components:

·        Data file and archive log backup sets and backup pieces.
·        Data file copies.
·        Archived redo logs and their copies.
·        Tablespaces and data files on the target database.
·    Stored scripts. These are named, user-created sequences of RMAN and SQL commands.


ORACLE RMAN CONFIGURATION:


For oracle online (hot) backup, the database should be in archive log Mode.

To check, login as sysdba run the following command.


In the above  example, the database in No Archive Log mode. We need to change it to Archive log mode.


First shutdown the database, and run the following command to change it to archive log mode.


Now it changed to Archive Log Mode.


For RMAN Backup & Restore, RMAN requires a catalog Database to store the backup information.


Then create a new catalog database for RMAN using database Configuration Agent.


Select create database.


Database Name and SID. (Here I have used catdb)


Default file location from the template.


Copying the db files and creating the database.


After successful creation of database, check the Archive log mode.


Then login to rman and register the source database in catalog db using the following command.


Run report schema, to check the data files in target registered database.


RMAN Configuration parameters.


To change the RMAN configuration use the following command.

 Here I have used to change the controlfile autobackup on.

Whenever you run  a database backup, automatically control files also added to the backup.


Run the following command to database backup. This would automatically backup the control files also.


To list the backup sets.


To list the backup summary.


To Restore, always the target database should be in offline.
Now connected through RMAN, DB is not started.(May be files corrupted and we need to retore and recover.)


First restore the control file and mount the database, then restore the database from the backup sets.


Then mount the database, restore the database from the backup set.

Oracle database restore uses the two sections.

1. restore
2. recovery


Backup sets are restored successfully.


Now run the recover database command to recovery and sync the database to the log db.


NetBackup 8.1.2 & Oracle Configuration:

Add the Oracle Database and Register with NetBackup. You need Target DB credentials and RMAN credentials.

Target DB : ORCL


RMAN Catalog Db : catdb


Database instances are registered and active.


We can list the registered instances using CLI also.


Next define the policy. (Oracle Intelligent Policy)


Create policy with oracle policy type.


Schedule.


Select the Database instances to take a backup.


Then backup selection, whole database or table space etc..


Oracle parameter settings like numbers of streams format of the backup images.


Run a manual backup to test. Backup successfully completed. 


Check the detailed status, it invokes the RMAN and taking the backup.


As per our configuration , it would have taken control files also.


Check and list the RMAN backup sets, we can see the new backup sets also.


This  records are available in database while you are taking backup.


After taking a backup, I had added the new record to the database.


Now I do restore the database to recover.

Open the NetBackup Client BAR to restore.


Select the instance or datafiles to restore.


It will open the oracle recovery wizard.


Provide the target database credentials.


RMAN recovery catalog credentials.


Select the restore and recovery options.


Select the database state.


Selection Summary.


After successful restore, check the database records.