Tuesday, December 31, 2019

ONTAP 9.7 Fabric Pool Mirroring


Fabric Pool Overview

FabricPool, first available in ONTAP 9.2, is a NetApp Data Fabric technology that enables automated tiering of data to low-cost object storage tiers either on or off premises. Unlike manual tiering solutions, FabricPool reduces total cost of ownership by automating the tiering of data to lower the cost of storage. It delivers the benefits of cloud economics by tiering to public clouds such as Alibaba Cloud Object Storage Service, Amazon S3, Google Cloud Storage, IBM Cloud Object Storage, and Microsoft Azure Blob Storage as well as to private clouds such as NetApp StorageGRID®. FabricPool is transparent to applications and allows enterprises to take advantage of cloud economics without sacrificing performance or having to rearchitect solutions to leverage storage efficiency.

• ONTAP supports FabricPool on AFF systems and all-SSD aggregates on FAS systems.


• ONTAP Select supports FabricPool. NetApp recommends using all-SSD FabricPool aggregates.


NetApp brings in an innovation in Flash storage systems, the Fabric Pool aggregates. With FabricPool aggregates, you can move your cold data to external, less expensive storage solutions available today.

FabricPool 
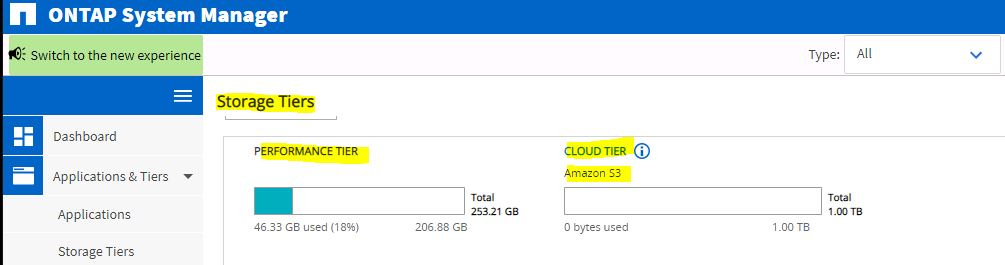
is an all SSD aggregate that has an external capacity tier attached to it. Data that is written to the SSD aggregates is called as Performance tier and backup and/or snapshots that is moved to Amazon S3 or Netapp StorageGrid Webscale is called as Capacity Tier. 

FabricPool will be designed as an innovative technology that allows any workload (SAN or NAS) on an ONTAP system to keep hot data on all-Flash but tier inactive cold data off onto low-cost object storage, either on-premises or in the Cloud. This inactive data is often up to 80% of the overall storage footprint, leading to significant savings. 


You can attach capacity tiers to SSD aggregates and set tiering policies on the SSD volumes. Currently supported tiering policies are:

·         Snapshot-only which is the default
·  Backup – Data is tired to the capacity tier as snapmiror/snapvault destinations

·         None

Managing FabricPool mirrors
To ensure data is accessible in data stores in the event of a disaster, and to enable you to replace a data store, you can configure a FabricPool mirror by adding a second data store to synchronously tier data to two data stores. You can add a second data store to new or existing FabricPool configurations, monitor the mirror status, display FabricPool mirror details, promote a mirror, and remove a mirror. You must be running ONTAP 9.7 or later.

Creating a FabricPool mirror

To create a FabricPool mirror, you attach two object stores to a single FabricPool. You can create a FabricPool mirror either by attaching a second object store to an existing, single object store FabricPool configuration, or you can create a new, single object store FabricPool configuration and then attach a second object store to it. You can also create FabricPool mirrors on MetroCluster configurations.

Fabric Pool Mirroring:


To implement a fabric pool mirror, first create a Cloud Tier (Fabric Pool) with two object stores and attach aggregates.


Specify the amazon account with your access key information, then provide the s3 bucket name which you had created in amazon s3.


Once the authentication is successful, then the cloud tier will create.

Object store created successfully.


Using CLI, you can list the object store configuration and the aggregates which are attached to it.

In this example, we have one object store (aws_s3) and two aggregates (aggr1 & Aggr2) attached to it.

Both the mirror type is primary.


Add one more object store (aws_s3_DR).


Now I have two object stores (aws_s3 & aws_s3_DR).


Then you can create a fabric pool mirror using object store mirror command.


Now you can see aws_s3 is primary and aws_s3_DR is mirror.


You can promote the mirror to primary also using the following command.


Now aws_s3_DR is primary and aws_s3 is Mirror.


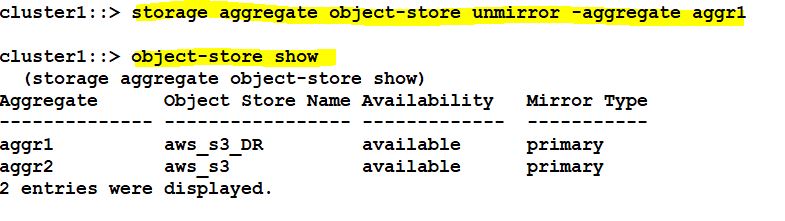
If you don’t want mirror, then you can unmirror this using the following command.

Now it is unmirrored and both are primary.


Sunday, December 22, 2019

NetApp Trident with Kubernetes


What is Trident?

Trident is a fully supported open source project maintained by NetApp. It has been designed from the ground up to help you meet the sophisticated persistence demands of your containerized applications.
Through its support for popular container platforms like Kubernetes and Docker, Trident understands the natural and evolving languages of those platforms, and translates requirements expressed or implied through them into an automated and orchestrated response from the infrastructure.
Today, that includes our ONTAP (AFF/FAS/Select/Cloud), Element (HCI/SolidFire), and SANtricity (E/EF-Series) data management software, plus the Azure NetApp Files service in Azure, the Cloud Volumes Service for AWS in Amazon Web Services, and the Cloud Volumes Service for GCP in Google Cloud. That list continues to grow.
Persistent Storage Concepts and Trident Configuration This section of the lab explains how Trident integrates with Kubernetes. It also explores the Kubernetes and Trident elements that a storage administrator will have to configure to enable DevOps users to provision storage with Trident. Kubernetes and Trident operation relies on several constructs that DevOps engineers and storage administrators need to be familiar with.

Pod: A pod describes a unit of deployment for an application or application service (i.e., microservice). A pod consists of one or more containers that are expected to be executed together.

Deployment: A pod with additional metadata and features, such as the number of replicas that should be running at any time. In other words, a deployment is one of the ways to describe an application to Kubernetes. For example, a deployment with one replica specified means that Kubernetes will ensure that one instance of the pod is always running somewhere in the cluster.

Storage Class: Provides an abstract definition of storage. Each storage class has a provisioner and some number of defined parameters. For NetApp, the provisioner is Trident, an open source project which manages the creation and destruction of volumes for ONTAP, SolidFire, E-Series storage arrays, Cloud Volume Service in AWS, and Azure NetApp Files.

Persistent Volume (PV): A storage device that a container uses to store persistent data. It is decoupled from the pod and has a lifecycle of its own.

Persistent Volume Claim (PVC): A user/application creates a PVC to request access to persistent storage. The PVC describes requirements like the size and type of the required volume (e.g., “I need 20 GiB of storage”), which Kubernetes evaluates against its inventory of available PVs, and assigns one that meets those needs. The application can then utilize the PVC to ensure that Kubernetes mounts the assigned PV to the host that is executing the pod. If the PVC specifies a storage class, then Kubernetes follows the same process to find a match in the existing pool of PVs. However, if it cannot find a matching PV, Kubernetes will rely on the provisioner specified in the storage class to create a suitable match.

Namespace: A namespace is an administrative division of resources in the cluster that provides isolation between users, their pods/deployments, and resource assignments.


To list the Nodes and Namespaces.


List the NetApp Trident version.


Listing the crds.


List the deployment information.


List the storage backends. Ex. ONTAp and Solidfire storages are connected as backends.


Listing the storage classes.


Storage Class in details:


Login to ONTAP Cluster and list the flexvolume that already created.


Now run the yaml or json script for claiming storage space for the container using NAS.


After executing, the volume is created successfully.


Check the backend UUID:


Snapshot creation for Data Protection:


Wednesday, November 27, 2019

NetApp ONTAP 9.7 Overview


NetApp has announced its next big update to its data management software, ONTAP, with version 9.7. ONTAP allows organizations to build a secure, powerful and intelligent storage infrastructure with the ability to deploy storage (via hardware storage systems, software-defined storage, and the cloud) while unifying data management across all of them.


The new management UI for ONTAP System Manager will save you time by showing key system information about capacity, hardware health, networking, and performance history with up to one year of data. Only one screen is needed for provisioning LUNs or NAS volumes. You don’t have to be a storage expert to configure and manage your ONTAP system.


ONTAP SYSTEM MANAGER 9.7:


ONTAP 9.6 upgrade to ONTAP 9.7

First Download the image from Netapp support site and keep it in your HTTP server.
Then download the image to your NetApp ONTAP cluster.


Now the new ONTAP 9.7 package is available for upgrade.


List the current ONTAP version image.


Now go for upgrade using the following command.


Show upgrade progress.


ONTAP 9.7 update was successful.


Check the update history.


 Check the version.


New ONTAP SYSTEM MANAGER 9.7 UI:


The new UI shows, Health, Capacity, Network  and Performance in single page.
This is providing a performance history for one year.


User friendly, complete cluster configurations.

1. Auto Support
2. SAML Settings
3. LDAP
4. Licenses
5. User & Roles
6. Cloud Registration (NDAS)
7. UI settings


Cluster Overview.


New Host tab, which has all the SAN host information like igroup.


Network Ethernet Ports.


Same you can switch to old classic view also.


Storage VM:

Using ONTAP SYSTEM MANAGER 9.7 UI, we can easily create SVM with all protocol settings in single page. (NFS, CIFS and iSCSI)


Add Storage VM  and enable the Access Protocols.


Specify the Active Directory and DNS information for CIFS server.


 Enable NFS protocol and provide the LIF and IP address.


Storage VM Management interface and admin account.


Storage VM add successfully with all the protocols are enabled.


Protocol performance view.


SMB/CIFS protocol view.


Edit NFS settings.


NFS Enhancements:

New feature is added to list the active nfs connections.


In a single page you can create volumes for NAS or SAN and also for cloud tiering (FAbric Pool)


Add a NAS volume.


Specify the Access Permissions.


Volume created successfully with export-policy and mount paths also.

Now this volume is ready for accessing from windows or unix clients.


 Access the cifs share from windows server.


Mount the volume in linux (NFS).


Get the iqn from esx 6.5 and add LUN.


Adding LUN's and you can add number of lun's in one single page.


Lun is added and mapped.


In ESX server, rescan HBA's and it discover the netapp LUN.


Cloning the volume.


Easily you can check the clone hierarchy.


Another one important feature in 9.7, you can convert the flexvol to Flexgroup.


First validate before volume conversion.


Convert the flexvol to flexgroup.


Successfully converted to flexgroup.