NetApp HCI:
NetApp HCI provides both storage and
compute resources, combining them to build a VMware vSphere environment backed
by the capabilities of NetApp Element software. You
can integrate NetApp HCI seamlessly with other products in the NetApp Data
Fabric, creating a complete solution for your datacenter.
After successful deployment of NetApp
HCI, you manage the system from the VMware vSphere Web Client. The NetApp
Element Plug-in for vCenter Server (also referred to as the vCenter Plug-in, or
VCP) is used to manage storage resources, including datastores, volumes,
Quality of Service, storage cluster components, and data protection. Compute
nodes appear as ESXi hosts and you can manage them in vSphere.

Minimal Configuration:

Deploying NetApp HCI
The NetApp Deployment Engine enables
you to quickly deploy NetApp HCI. During deployment, you can let the NetApp
Deployment Engine automatically set many of the networking configuration
details for you. After deployment, NetApp HCI will be ready to serve highly
available compute and storage resources in a production environment.
The
NetApp Deployment Engine (NDE) greatly simplifies the configuration of NetApp
HCI. By presenting a few consolidated web forms to fill out, the NDE quickly
gathers the needed information and automates the deployment of the following
HCI components:
•
Element storage cluster.
•
vSphere ESX hypervisors.
•
vSphere datastores hosted on the Element cluster.
•
vSphere vCenter server instance (or, optionally, it utilizes an existing
vCenter instance).
•
NetApp Management Node (for managing the Element cluster, including the vCenter
plugin).
Deployment Process:
Accessing the NetApp Deployment Engine
To deploy NetApp HCI, you need to access the NetApp
Deployment Engine on one of the NetApp H-Series storage nodes via the IPv4
address assigned to the Bond1G interface, which is the logical interface that
combines ports A and B for storage nodes. This storage node becomes the
controlling storage node for the deployment process. Depending on your
environment, you need to either configure the IPv4 address or retrieve it from
one of the storage nodes.
Access the NDE

Check and Accept the prerequisites.
Power on all network switch and compute and storage nodes.

Accept the End User License Agreement for the following:
1. NetApp EULA
2. VMware EULA

Next provide the vSphere Config details
version, vCenter Server FQDN and User Credentials.

Provide the Credentials for Storage Node, vCenter and Management Node.

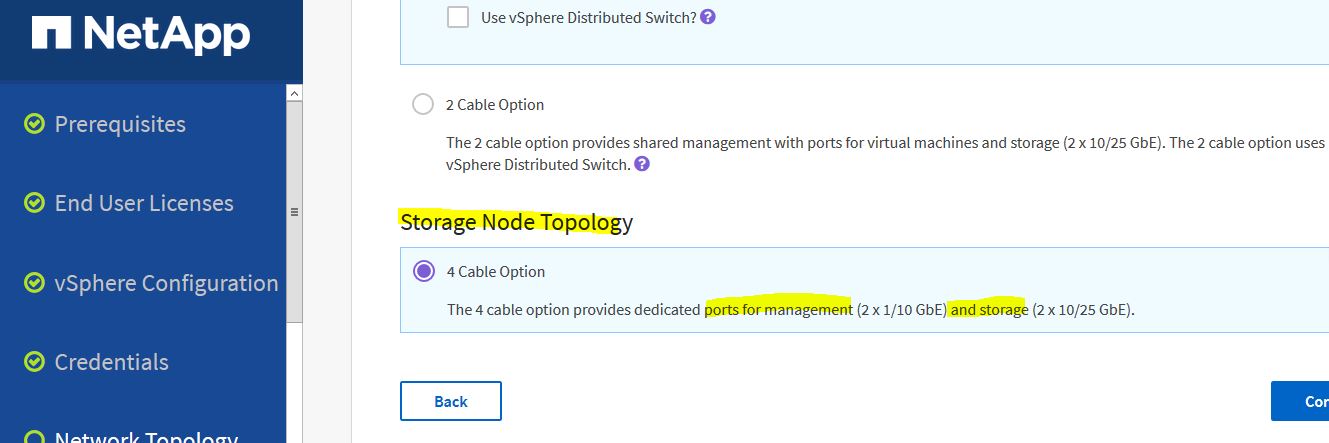
Next provide the Network Topology config details for compute and storage nodes.
If you are going to use distributed switch then select that option.

This will do the inventory of your compute and storage nodes, then select the nodes for your configuration.


Then Network settings, provide the DNS Server and NTP server details.
Then launch the easy form to enter fewer network settings.

Set the vCenter and Management Node Networking details.

Set the Compute Node network details.

Storage Node Network details.

Easy form Network Settings.

Once you provide all the network details then apply this.


Then start the deployment Process.

The
NDE will now automate the following tasks:
•
Create a four-node Element cluster.
•
Create two Element volumes for use as vSphere datastores.
•
Create two ESX hypervisor hosts.
•
Add the ESX iscsi initiators to the Element configuration.
•
Create an Element Volume Access Group and configure it to include both
datastore volumes and both ESX initiators.
•
Format the attached volumes (iscsi LUNs) with VMFS.
•
Configure vSphere portgroups and uplinks for managing VM traffic, including
vCenter and the Management Node.
•
Deploy the vSphere vCenter Server Appliance (VCSA) onto an ESX host and use an
Element-supported datastore for the VCSA storage.
•
Register the two ESX hosts with the vCenter instance.
•
Deploy the NetApp Management Node and register it with vCenter.
Now you can monitor using the URL (NDE Monitoring)

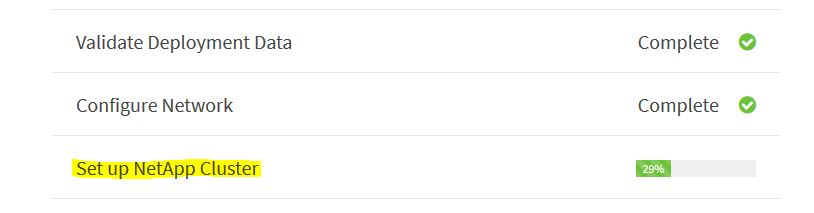
Setup Started.

First validate the Deployment data and then starts configuring Network.


Once the Network Config is done then it is setting up NetApp Element clusters.
Then it is setting up ESXi Server.

Now it is setting up vCenter Server.

Finally it is setting up the Management Node to Manage the Element cluster.


Now the installation and setup completed successfully.
Then we can access and manage using vSphere web client.


Login to vSphere web Client 6.7.

This deployment process automatically creates VMware HA DRS and add the 2 esxi Hosts and deploy NetApp Management Node and vCenter Server.

Now check with NetApp Element configuration and Management Plugins.

Cluster details.

Manage Node details and settings.

Report and iscsi sessions.


Data Store details.

You can do all the data protection from here it self like snapshot and replication.

Login to NetApp Element Management Node and check.


No comments:
Post a Comment