Friday, October 7, 2016

Netbackup 7.7.2 VTL Configuration

Netbackup 7.7.2 VTL Configuration:


Netbackup admin console, start the configure storage devices wizard.


Select the Media server name, which server to auto discover the tape library.


Now it detects one robo and tape drive automatically.


Now you can see the backup devices which discovered.


Verify or Modify the device configuration.


Once the config changes applied, then automatically restart the ltid (Media Manager service) automatically.


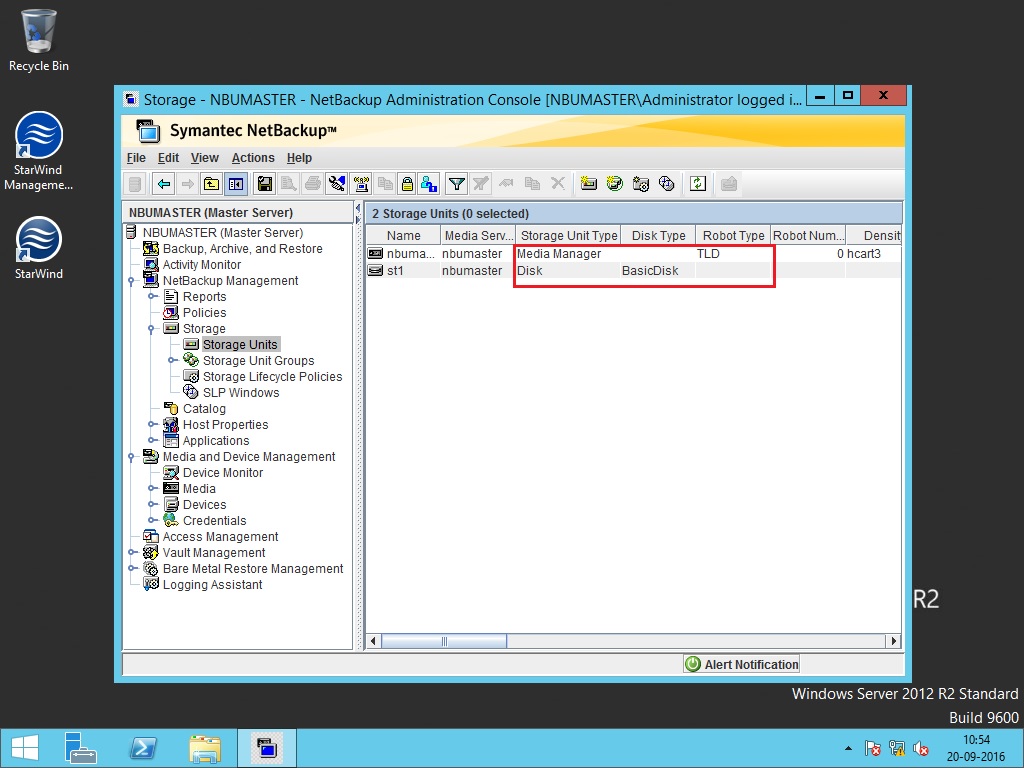
Now create a storage unit with the type of Media Manager.


Now successfully device was configured.


List and check the storage unit details.


List the drive status and details.


List the robo information.


Now inventory the volumes which is present in the tape library.


Select the Media server and Robo and start the inventory.


You can see the available tapes with the barcode.


Then, create a volume pool.


Create a volume and add to the volume pool.


List and check the volume details.


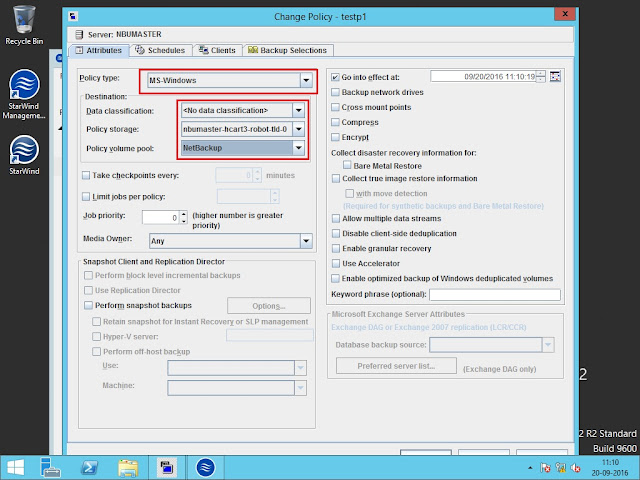
Now create a policy.


Select the policy type and storage unit.


Set the schedule type and backup window duration.


Add the clients.


Select the backup source path.


Run a manual backup to test.


Backup is active.


Test to restore the contents from the tape.


Tuesday, October 4, 2016

NetApp LUN Target Portset

LUN Target PortSet :


A port set consists of a group of FC target ports. You bind a port set to an igroup, to make the LUN available only on a subset of the storage system's target ports. Any host in the igroup can access the LUNs only by connecting to the target ports in the port set.
If an igroup is not bound to a port set, the LUNs mapped to the igroup are available on all of the storage system’s FC target ports. The igroup controls which initiators LUNs are exported to. The port set limits the target ports on which those initiators have access.
You use port sets for LUNs that are accessed by FC hosts only. You cannot use port sets for LUNs accessed by iSCSI hosts.


Create and start the FCP service.


List the FCP adapters.


Create FCP logical interfaces.


Create a portset with access through a specific LIF's.


Create an igroup and attach with the port set. So the initiator access through only this SAN LIF's.


NetApp Flexvol Rehosting to another SVM


Volume Re-hosting to another SVM:

You could move the volume from one aggregate to another aggregate but not to another SVM.

But from Data ONTAP 9 onward, you could move the volume from one SVM to another SVM.

But this operation is disruptive one. You need to unmount the junction path and rehost from source SVM to Destination SVM.


In this example, i am using two vservers like vs3 and vsnew.


Create a new volume in venew vserver.


Check the volume status.


Noe rehost the volume from vsnew to vs3 SVM.


Now if you check, the volume managed by vs3 SVM.


Sunday, October 2, 2016

NetApp ONTAP 9 SVM-DR Configuration Steps


NetApp ONTAP 9 SVM-DR Configuration Steps:


What is SVM DR?


Storage Virtual Machines (SVMs) are essentially blades running Data ONTAP, more or less. They act as their own tenants in a cluster and could represent individual divisions, companies or test/prod environments.
However, even with multiple SVMs, you still end up with a single point of failure – the storage system itself. If a meteor hit your datacenter, your cluster would be toast and your clients would be dead in the water, unless you planned for disaster recovery accordingly.

 Steps:

In this Post i am using two clusters

1. Cluster1
2. Cluster2


1. First check the intercluster role LIF is present in both the clusters.


2. Then create cluster level peer relationship on both nodes.


3. Check and list the cluster peer relationship on both the nodes.


4. Create a vserver peer relationship on both nodes.


4. Check the vserver peer relationship on both the clusters.


5. On the destination cluster create a snapmirror relationship between the source svm and destination svm.


6. Then initialize the snapmirror, it will do the base line transfer.


7. Now check the status of this snapmirror, successfully done.


8. Destination cluster, the vserver is in stop state.


9. Also the LIF is in down state.


10. But in source cluster the LIF is up and clients are accessing through it.


11. In Source cluster, stop the vserver.


12. In destination cluster quiesce the file system.


13. Now break the relationship.


 14. In destination cluster, start the vserver.


15. Now mount the same NFS share in the linux host server.


16. Now automatically the LIF is up in destination cluster with the same IP.


17. IN source cluster vserver is stopped.


18. Network LIF is in down state.


FAIL BACK:

19. Again create a snapmirror relationship from source cluster.


20. Then resync now.


21. Once successfully resync, destination cluster stop the versver.


22. In source cluster, break the relationship.


23. Start the verser now.


24. Automatically LIF is up and you can access the data from the same ip from linux host.