Friday, July 29, 2016

Clustered data ontap intercluster snapmirror Configuration

Clustered data ontap intercluster snapmirror Configuration:


NetApp® SnapMirror® software has been the preferred technology for replication and disaster recovery in a wide variety of NetApp storage environments for years because of its proven efficiency, simplicity, and modest cost when compared with other DR solutions. Over the years, NetApp has continued to enhance SnapMirror with new features and capabilities to make the product fit an even broader range of requirements and to use network bandwidth even more efficiently.

1. Both clusters check and create LIF with role intercluster.


2. Create a peer relationship between the clusters.


3. Create a vserver peer relationship between the source and destination cluster vservers.


4. Create a source volume.


5. Create a destination volume on destination cluster vserver.


6. Check the snapmirror license and add the license.


7. Create the snapmirror relationship between source and destination clusters.


8. Initialize the snapmirror relationship, then it will create a source base snapshot and do the base line transfer.


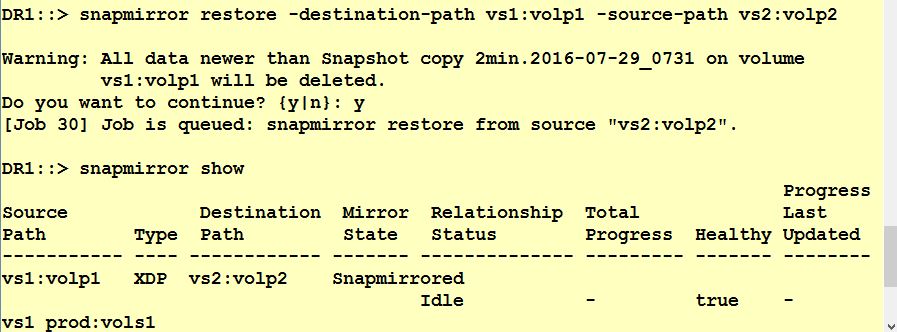
9. Check the relationship.


10. Mount the source and destination volumes on linux server.


11. Now create a file in source volume.


12. Now check from the destination volume. As per the snapmirror schedule, it will replicate to the destination.


13. Now you can able to see the files in destination volume.


Clustered Data Ontap 8.x Quota Management

Clustered Data Ontap 8.x Quota Management:


About quotas

Quotas provide a way to restrict or track the disk space and number of files used by a user, group, or qtree. 

You can use quotas to limit resource usage, to provide notification when resource usage reaches specific levels, or to track resource usage.
You specify a quota for the following reasons:
  • To limit the amount of disk space or the number of files that can be used by a user or group, or that can be contained by a qtree
  • To track the amount of disk space or the number of files used by a user, group, or qtree, without imposing a limit
  • To warn users when their disk usage or file usage is high

1. Check the qtrees.


2. Create a qtrees.


3. Create a new quota policy.


4. Write a quota rule to the policy.


5. Modify the policy information to the vserver.


6. Now enabling the quota on volume.


7. Mount the qtree from the linux server through NFS, now you can see the amount which you specify in the quota rule.


8. Modify the quota rules.


9. Resize the quota rules to the volume.


10. Now check from the Linux server, you can see the limit.


C-DOT snapvault Configuration Step By Step


C-DOT snapvault Configuration:

SnapVault is a disk-based storage backup feature of Data ONTAP. SnapVault enables data stored on multiple systems to be backed up to a central, secondary system quickly and efficiently as read-only Snapshot copies.


overview of Necessary Steps


    1. Create a data SVM on the destination cluster with DP volumes
    2. Create intercluster lifs on all nodes in both the  clusters
    3. Configure a peer relationship between the two clusters
    4. Configure a peer relationship between the source and destination SVM
    5. Make sure the SnapMirror labels are specified in the appropriate SnapShot policy on the Source cluster
    6. Apply that SnapShot Policy to the Source volume
    7. Create a Vault Policy on the Destination data SVM specifying the number of each type of SnapShot that you wish to retain on the destination 
    8. On the Destination data SVM define a SnapVault relationship between the source volume and the destination volume specifying the replication schedule and the Vault Policy require

1. Create an Aggregate with the required size and RAID level.


2. Create a SVM and root volume.

3. Check the allowed protocols.


4. Create a volume in that vserver and this volume act as a source volume. Source volume should be in RW type.


5. Create an Aggreagte in the second cluster.


6. Create a SVM and root volume.


7. Create a volume and this volume is destination volume and should be DP type.


8. Create a job schedule.


9. Create a new snapshot policy and use the snapmirror label, the same name which is required for the destination snapmirror policy.


10. Change this snapshot policy to the source volume.


11. Check the snapvault license if it is not added , add the license.


12. In the destination cluster, create a snapmirror policy.


13. Add the snapmirror policy rule, with snapmirror label name.


14. Create Cluster peer and vserver peer relationship.


15. Create a snapmirror relationship between source volume and destination volume. Use XDP type for snapvault.


16. Now initialize this, at this point in time it will create a new base snapshot and do the base line transfer to the destination volume.


17. List the source volume snapshots, now you can able to see the snapmirror prefix snapshot.


18. To check the snapvault, run the following command.


19. Mount the source volume in the linux server through NFS and create a few files.


20. As per your schedule time, mount the destination volume in linux through NFS and test the files.


21. Edit your existing file.


22. To restore run the following command.


23. Now the file restored with the old contents.