Friday, January 12, 2018

ONTAP 9.3 Advanced Cluster Setup


Cluster Peering and SVM peering:


In System Manager, select the advanced cluster feature, click the cluster peering.


This setup will do the following steps:

1. Check the intercluster role LIF
2. Cluster Peer
3. SVM Peer.

First it will check the Intercluster role LIF and fetch the details also.


Then provide the destination cluster ipaddress of Intercluster role LIF and pass phrase.


Provide the pass phrase and initiate the cluster peering.


Now the cluster peer created successfully.


Now this will take you to peer the SVM.

Provide the SVM information on both source and Destination cluster.

Initiate the SVM peer relationship.


SVM peer created successfully.


List the cluster and SVM peer information summary.


List the peer information in CLI using the following command.


ONTAP 9.3 Upgrade


Power on the ONTAP 9.2 Image.


While it is booting, Press Ctrl + C to get the advanced boot Menu options.


Select the Option 7 - Install the software first.


To download the package 9.3 configure one Network interface and set the ipaddress.


Download the ONTAP 9.3 Image and Store it in HTTP server.

Now provide the URL for your 9.3 Image.


It will start to download and once it would download complete successfully, it will restart.


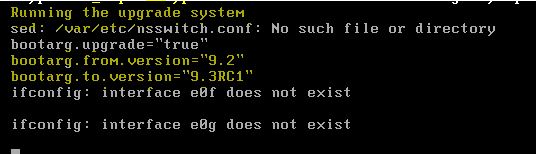
Automatically upgrade script will start and upgrade it.


Now it will boot the storage with ONTAP 9.3 Image.


Now clean the config and initialize all disks.


Node Management configuration.


ONTAP 9.3 upgrade Successfully done.

Now login to the console and configure the storage.


ONTAP 9.3 SVM creation using Templates


Ontap 9.3 Supports to create a SVM using Templates.

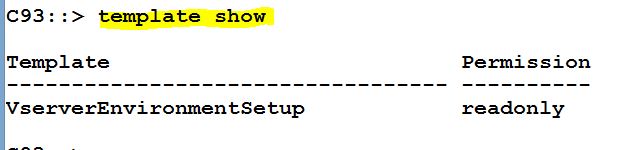
List the built-in templates using the following command.

The built-in template always in a readonly mode.


You can provision (Create) a new SVM using the template.

This template has the following Sections:

1. Vserver Section
2. Network Interface Section
3. Network Router Section
4. DNS Section
5. NIS Section
6. LDAP Section
7. Protocol Section.

Just provide the information as interactive command.


Vserver successfully created.


The provision command automatically creates an LIF also.


The protocol service, you defined also started.


To list the template parameter.


Now you can copy the template and customize the parameter as you wish.


Just modify the parameter.


ONTAP 9.3 Export-Policy Rule Config Checker


Create a New export policy for NFS share using the following command.


Create a new export policy rule for the new policy.


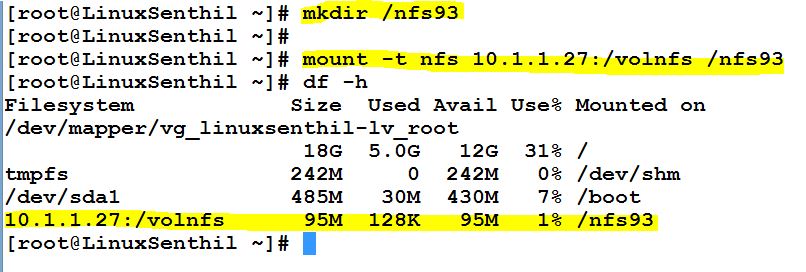
Now mount the NFS share in LInux Server.


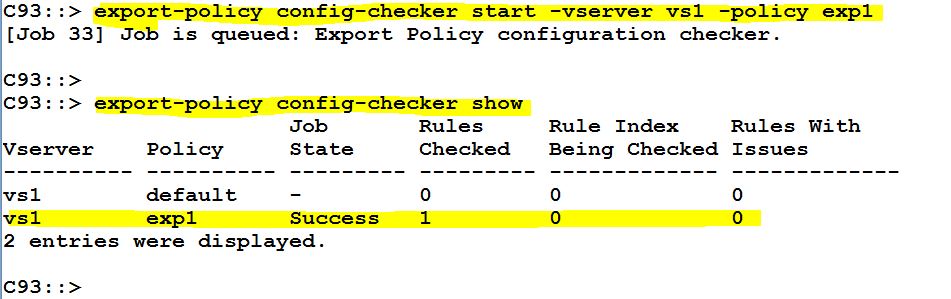
There is the new option in 9.3 to check the export policy rules using the following command.


ONTAP 9.3 Up-gradation


NetApp ONTAP 9.3 Upgrade:


1. Check the current ONTAP version using the following command.

Also check the image repository.


2. Download the ONTAP 9.3 Image from NetApp Site and keep it in the http server.

Now run the following command to download the ONTAP 9.3 Image to the filer's Repository.

Once you execute this command, this will download the 9.3 image from the HTTP server and process it.


3. Run the following command to check the Current ONTAP version and Is default value also.


4. From ONTAP 9.x onward, you can update the software from System Manager also.


5. ONTAP 9.3 Image successfully downloaded from the HTTP server and Processed the package also.


6. Now system is ready for the 9.3 version up-gradation.


7. Run the following command to check the repository.

After successful download from HTTP server, you will be able to see this 9.3 Image.


8. Now go for an up-gradation, using the following command.

Also acknowledge the errors and warnings. (validate the New 9.3 Image).


9. Now check the upgrade process.


10. Same as you can check the upgrade process from System Manager.


11. Now the system is rebooting with ONTAP 9.3 Image.


12. This will run the upgrade script automatically.


13. After successful reboot, check the upgrade status.

Now the 9.3 up-gradation was successfully completed.


14. Also you can check the upgrade history also.


15. Now you can check the version and check the image information.


16. Access the storage from System Manager and now you can see the new System Manager 9.3


17. New 9.3 System Manager Dash Board.


18. You can check the update history using CLI also.